![]() At this point, with all the items removed from the frameset and bagged and tagged, you need to make a final decision on how far your refurbishment is going to go. If your intention is to clean, polish and wax the frame and fork, clean and lube the components and then reassemble you need go no further in your disassembly process. Leave the headset cups in the frame along with the bottom bracket fixed cup. Then, using some kind of solvent (I used a citrus based cleaner), clean off the accumulated road grime and grease. Assuming the paint and chrome are largely intact, take a polishing compound and gently polish the paint surfaces. Be careful of chrome as it may or may not a have a lacquer clear coat. Polishing compound can usually be differentiated from rubbing compound because it is typically white whereas rubbing compound is coarser and creamy or beige in colour. Usually avoid the rubbing compound as it cuts very quickly and old paint tends to already be thin and ravaged. Once the paint is clean, waxing with an automotive paste or liquid wax of your choice can proceed followed by buffing with a microfiber cloth. Alternatively, my brother swears by Pledge spray-on furniture polish although I am not sure that the lemon scent helps in any way.
At this point, with all the items removed from the frameset and bagged and tagged, you need to make a final decision on how far your refurbishment is going to go. If your intention is to clean, polish and wax the frame and fork, clean and lube the components and then reassemble you need go no further in your disassembly process. Leave the headset cups in the frame along with the bottom bracket fixed cup. Then, using some kind of solvent (I used a citrus based cleaner), clean off the accumulated road grime and grease. Assuming the paint and chrome are largely intact, take a polishing compound and gently polish the paint surfaces. Be careful of chrome as it may or may not a have a lacquer clear coat. Polishing compound can usually be differentiated from rubbing compound because it is typically white whereas rubbing compound is coarser and creamy or beige in colour. Usually avoid the rubbing compound as it cuts very quickly and old paint tends to already be thin and ravaged. Once the paint is clean, waxing with an automotive paste or liquid wax of your choice can proceed followed by buffing with a microfiber cloth. Alternatively, my brother swears by Pledge spray-on furniture polish although I am not sure that the lemon scent helps in any way.
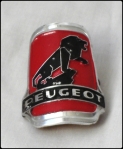
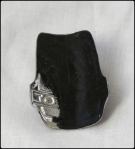
However, if the paint and chrome are deteriorated to the point of needing re-chroming and/or re-painting there will be further disassembly required. Should your  Course be one of the ones with a pressed and painted alloy badge then your work becomes more difficult. The frequently seen Peugeot decal or small plastic badge can be gently levered off the headtube using a plastic bladed dry wall applicator. The metal badge as shown to the left is far more tenacious. The backing of the badge is some kind of foam molded to the contours of the headbadge and coated with a terrifically sticky adhesive. The duplicate badge you see in
  the photos was removed from a Peugeot Super Sport donor bike on a hot summer day that softened the adhesive after sitting in bright sunlight. Removal took place with a plastic dry wall applicator and solvent and, even then, was not easy. Be prepared to work slowly and cautiously to avoid damage to the spongy backing material. (See left hand photo) Re-attachment later can be done with double sided carpet tape trimmed to the contours of the badge.
The headset cups can be gently removed with a long, flat bladed screwdriver and hammer or with the special tool made for this purpose. (See the YouTube video here.) The bottom bracket fixed cups can be extremely difficult to remove. You must ascertain whether yours is a French threaded bottom bracket, Swiss or English (ISO). The French BB fixed cup unscrews by rotating left just like a normal screw or bolt. The Swiss and English BB will unscrew by turning right which is counter intuitive. All of them in older frames will, typically, be extremely difficult to turn and if you are re-using the original crank and BB then you may want to seriously consider leaving the fixed cup in place and masking it for paint removal, media blasting and repainting. If you do not have the  special BB removal tools you may wish to take this to a bike shop to be done. I have been fought to a standstill by a Peugeot PX 10 Stronglight 93 fixed cup while using shop tools and a cheater bar for leverage so give serious thought as how to you wish to proceed. Finally, take out the water bottle screws, the seatpost fixing bolt and both of the Simplex dropout adjusting screws. Pre-order all your necessary decals from the sources on the sidebar, book your time with the framebuilder/painter who will do the re-finishing and then read carefully the next section on lugged Carbolite frames.